canonet ql17 manual
Canon Canonet QL17 Manual: A Comprehensive Guide
Discover a detailed resource for the Canonet QL17, encompassing repair manuals, service PDFs, and parts information, readily available for download and reference.
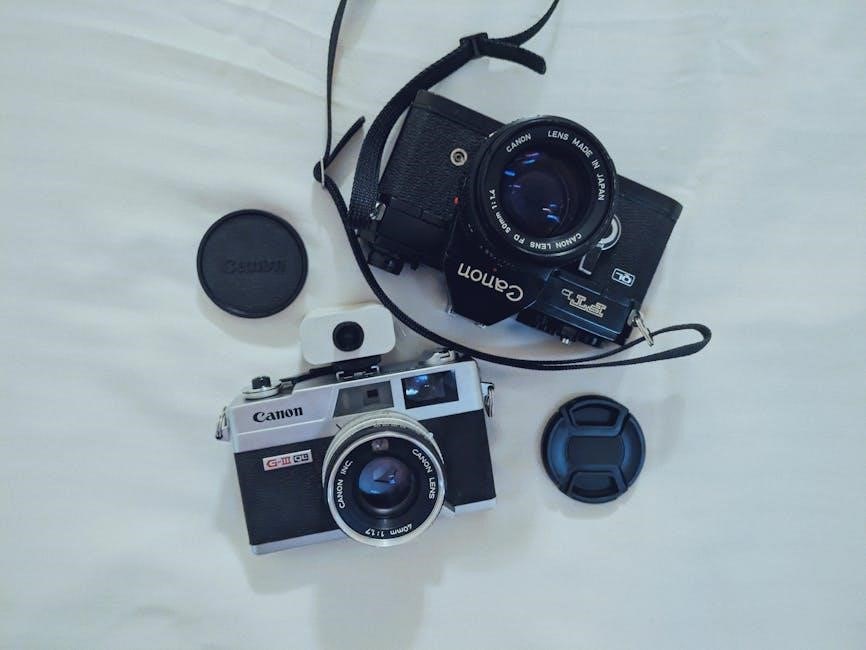
The Canonet QL17, a beloved 35mm rangefinder camera produced by Canon in the 1970s, remains a popular choice for film photography enthusiasts today. Its appeal stems from its compact size, sharp lens, and reliable performance, making it an excellent entry point into the world of classic cameras. This guide serves as a comprehensive resource for understanding, operating, and maintaining your Canonet QL17.
Often praised for its ease of use, the QL17 features a fast f/1;7 lens, allowing for beautiful bokeh and excellent low-light capabilities. The “QL” in its name signifies “Quick Load,” referencing its simplified film loading system. Numerous resources, including downloadable repair manuals and service PDFs, are available online to assist users with troubleshooting and maintenance. This camera represents a significant piece of photographic history, blending affordability with quality.
Historical Context and Significance
Released in 1971, the Canonet QL17 emerged during a golden age of 35mm film camera innovation. Canon aimed to provide a high-quality, accessible camera to a wider audience, challenging established brands. Its introduction coincided with growing consumer interest in compact, easy-to-use cameras capable of delivering professional-looking results. The QL17 quickly gained popularity, becoming one of Canon’s best-selling cameras.
The camera’s significance lies in its contribution to democratizing photography. Prior to models like the QL17, quality cameras often came with a steep price tag and complex operation. The availability of detailed repair manuals and service documentation, even decades later, underscores its enduring appeal and the dedication of its user base. It represents a pivotal moment in Canon’s history, solidifying their reputation for producing reliable and innovative photographic equipment.
Key Features and Specifications
The Canonet QL17 boasts a sharp 45mm f/1.7 Canon Lens, renowned for its excellent image quality and pleasing bokeh. It features a CdS exposure metering system, automating aperture selection for correct exposure in various lighting conditions. Shutter speeds range from 30 seconds to 1/500th of a second, offering versatility. The camera accepts standard 35mm film, making it accessible for both beginners and experienced photographers.
Key specifications include a mechanical shutter, manual focusing, and a hot shoe for external flash units. Its compact size and lightweight design enhance portability. Repair manuals detail the intricacies of its mechanical components. The QL17’s robust build quality ensures longevity, and readily available service documentation supports ongoing maintenance and repair efforts, contributing to its lasting legacy.
Understanding the Camera’s Components
Explore the Canonet QL17’s core elements: lens, aperture, shutter, and exposure metering system – crucial for mastering its functionality and achieving optimal results.
Lens and Aperture Settings
The Canonet QL17 features a sharp 45mm f/1.7 lens, renowned for its ability to produce pleasingly soft images with beautiful bokeh. Understanding aperture settings is vital for controlling depth of field and light intake. Lower f-numbers (like f/1.7) create shallow depth of field, ideal for portraits, isolating the subject against a blurred background.
Higher f-numbers (like f/8 or f/16) increase depth of field, keeping more of the scene in focus – perfect for landscapes. The QL17’s aperture is automatically set by the camera’s exposure system, based on the light meter reading and selected ISO. While you don’t manually adjust the aperture, recognizing its impact on image characteristics is key. The lens itself is a multi-coated element, contributing to reduced flare and increased contrast. Proper lens care, including cleaning, ensures optimal image quality and longevity of this exceptional lens.
Shutter Speed Control
The Canonet QL17 employs an electronically controlled shutter, offering speeds ranging from 30 seconds to 1/500th of a second. However, unlike many cameras of its era, the shutter speed isn’t directly selectable by the photographer. Instead, the camera automatically determines the appropriate shutter speed based on the light meter reading, chosen ISO, and aperture setting.
This automation simplifies operation, making it ideal for casual photographers. The shutter is leaf-type, contributing to quiet operation. Understanding how the camera prioritizes shutter speed is crucial; in brighter conditions, faster speeds are selected to prevent overexposure, while dimmer conditions result in slower speeds. Be mindful of potential camera shake at slower speeds, and consider using a tripod for sharp images. Regular use helps maintain the shutter’s accuracy and responsiveness.
Exposure Metering System
The Canonet QL17 features a CdS (Cadmium Sulfide) cell-based exposure metering system, renowned for its responsiveness and accuracy during its time. This system measures the light reflected from the scene and automatically adjusts the aperture to achieve a proper exposure. A needle in the viewfinder indicates the meter’s reading, centered when the exposure is correct.
The meter operates in a match-needle configuration; the photographer adjusts the aperture ring until the needle aligns with the center mark. This system requires the photographer to understand the relationship between aperture and depth of field. It’s important to note that CdS meters can be affected by extremely low or high temperatures, potentially impacting accuracy. Regular checks and understanding its limitations are key to successful shooting.

Operating the Canonet QL17
Master the QL17’s functions: film loading, ISO setting, precise exposure control, and effective focusing techniques for optimal photographic results and enjoyment.
Loading Film
Begin by opening the camera’s back cover, typically located on the left side when viewed from the rear. Insert a 35mm film cartridge into the film chamber, ensuring it sits securely in the film sprockets. Gently pull the film leader across the camera and align the perforations with the teeth of the take-up spool.
Advance the film using the film advance lever, observing that the rewind knob turns slightly as the film is taken up. Repeat this process several times to ensure the film is properly engaged and advancing smoothly. Close the camera’s back cover, and you’re ready to begin shooting. Remember to rewind the film completely before opening the camera again to prevent light leaks and damage to your images. Proper film loading is crucial for successful photography with the Canonet QL17.
Setting ISO and Exposure
The Canonet QL17 features a selenium light meter that automatically sets the aperture based on the selected ISO and shutter speed. To set the ISO, locate the ISO dial, usually around the lens, and rotate it to match the ISO rating of your loaded film (typically 25, 50, 100, 200, or 400).
The camera’s exposure system then handles the aperture selection. Observe the viewfinder; a red light indicates underexposure, a green light signifies correct exposure, and a yellow light suggests overexposure. Adjust the shutter speed dial to move the indicator towards the green zone for optimal results. Understanding this interplay between ISO, shutter speed, and the light meter is key to achieving well-exposed photographs with this classic camera.
Focusing Techniques
Achieving sharp focus on the Canonet QL17 relies on its rangefinder focusing system. Look through the viewfinder and observe the split-image rangefinder patch in the center. Rotate the focusing ring on the lens until the two images within the patch align perfectly. When aligned, your subject is in focus.
This method requires a steady hand and a keen eye. For moving subjects, pre-focus on a point where you anticipate the subject will be. Remember depth of field increases with smaller apertures (achieved automatically by the camera), providing a wider in-focus area. Practice makes perfect – consistent use will quickly develop your focusing skills with this delightful camera.
Troubleshooting Common Issues
Address frequent problems like exposure inaccuracies, shutter malfunctions, and lens difficulties using available repair manuals and service guides for the QL17.
Exposure Problems
Incorrect exposure often stems from a malfunctioning exposure metering system, a common issue with vintage cameras like the Canonet QL17. Verify the battery powering the meter, as a weak battery delivers inaccurate readings. If the meter seems unresponsive, consult the service manual for testing procedures and potential component replacements. Dark or overexposed images can also indicate issues with the aperture settings or shutter speed. Ensure the aperture is correctly set for the desired depth of field and lighting conditions. Check the shutter speeds for accuracy; a slow or stuck shutter will cause overexposure. Refer to repair manuals for detailed disassembly and cleaning instructions for both the meter and mechanical components. Online forums often contain user-shared solutions for specific exposure problems encountered with the QL17, offering valuable troubleshooting tips and insights.
Shutter Malfunctions
Shutter issues with the Canonet QL17 frequently involve sluggish operation or complete failure to fire. A common culprit is dried-up lubricant within the shutter mechanism, requiring careful disassembly and cleaning – detailed in repair manuals. Slow shutter speeds can result in blurry images, indicating a need for a complete shutter service. If the shutter doesn’t fire at all, check for obstructions or a discharged battery affecting the solenoid. Consult service PDFs for exploded diagrams to understand the shutter’s intricate parts. Repair guides offer step-by-step instructions for reassembling the shutter correctly. Online communities provide valuable advice from experienced QL17 owners who’ve tackled similar problems. Remember, shutter repair demands precision; improper handling can cause further damage, so proceed cautiously or seek professional assistance.
Lens Issues
Lens problems on the Canonet QL17 often manifest as haze, fungus, or separation of lens elements. Haze can reduce contrast and clarity, sometimes requiring professional cleaning. Fungus, if left untreated, can permanently damage the lens coating. Separation indicates potential glue failure, demanding careful re-cementing – a task best left to experts. Repair manuals detail lens disassembly procedures, but caution is crucial. Service PDFs provide diagrams illustrating the lens construction. Check for oil on the aperture blades, which can cause sticking. Online forums offer advice on DIY cleaning solutions, but use them cautiously. Always prioritize gentle handling to avoid scratching the lens surface. Consider professional servicing for complex lens repairs to ensure optimal image quality.

Repair and Maintenance
Essential upkeep includes cleaning, battery changes, and accessing service manuals – PDFs offering detailed repair guidance for the Canonet QL17’s longevity.
Basic Cleaning Procedures

Maintaining your Canonet QL17’s pristine condition begins with regular, gentle cleaning. First, utilize a soft-bristled brush or a blower to remove loose dust and debris from the lens surface, body, and film chamber. Avoid applying excessive pressure, which could potentially scratch the delicate coatings. For stubborn smudges on the lens, employ a lens cleaning solution specifically designed for camera optics, applying it to a microfiber cloth – never directly onto the lens.
Carefully wipe in a circular motion. The camera body can be cleaned with a slightly damp (not wet!) cloth. Pay attention to the light meter window, ensuring it remains clear for accurate readings. Inspect the film compartment for any residual film particles or dust, removing them with a clean brush. Regular cleaning prevents buildup that can affect performance and image quality, ensuring your Canonet QL17 remains a reliable companion for years to come.
Battery Replacement
The Canonet QL17 utilizes a PX28 battery to power its electronic shutter and light meter. Accessing the battery compartment typically involves a small latch or screw on the camera’s underside. Carefully open the compartment and remove the old PX28 battery, noting its polarity (+ and -) for correct installation of the new one. Ensure the battery contacts are clean and free from corrosion; if necessary, gently clean them with a cotton swab dipped in isopropyl alcohol.
Insert the new PX28 battery, aligning the positive and negative terminals correctly. Securely close the battery compartment; Incorrect battery installation can damage the camera’s electronics. After replacement, test the light meter and shutter functionality to confirm proper operation. Consider keeping spare PX28 batteries on hand, as they are essential for the camera’s full functionality, especially during extended shooting sessions.
Accessing Service Manuals & Repair PDFs
Locating comprehensive service manuals and repair PDFs for the Canonet QL17 can significantly aid in troubleshooting and repair efforts. Several online resources host these valuable documents. Websites dedicated to vintage camera repair often provide downloadable PDFs, sometimes free of charge, while others may require a small fee or registration. A direct link points to a 45-page Canon Canonet QL17 Repair Manual available as a PDF.
Additionally, broader collections of camera manuals, including those for Canon models, can be found through dedicated archive sites. Searching for “Canon Canonet QL17 service manual PDF” will yield numerous results. Be cautious when downloading from unfamiliar sources to avoid malware. These manuals typically include detailed diagrams, parts lists, and step-by-step repair instructions, empowering enthusiasts to tackle common issues independently.
Resources and Further Information
Explore online forums, communities, and Canon support for parts, documentation, and assistance with your Canonet QL17’s repair and maintenance needs.
Online Forums and Communities
Engage with fellow Canonet QL17 enthusiasts through dedicated online forums and photography communities. These platforms serve as invaluable hubs for sharing knowledge, troubleshooting issues, and discovering repair tips. Users frequently post detailed experiences, offering solutions to common problems like exposure inaccuracies or shutter malfunctions.
Benefit from collective wisdom regarding film loading techniques, ISO settings, and focusing methods specific to this classic camera. Many forums host threads dedicated to locating replacement parts, discussing service manual availability, and even coordinating repair services. Active communities often feature user-submitted photos taken with the QL17, inspiring creativity and showcasing the camera’s capabilities.
Search for groups on platforms like Reddit (r/analog) or dedicated classic camera forums to connect with experienced users who can provide personalized guidance and support. These online spaces are a fantastic resource for both beginners and seasoned QL17 owners.

Where to Find Replacement Parts
Sourcing replacement parts for the Canonet QL17 can require diligent searching, as it’s a vintage camera. Online auction sites like eBay are frequently the primary source, offering a rotating selection of components – from light seals and aperture rings to complete lens assemblies. Specialized vintage camera parts retailers also stock frequently needed items, though availability fluctuates.
Consider exploring camera repair shops; some may have salvaged parts from previous QL17 repairs. Websites offering comprehensive repair manuals sometimes list suppliers for specific components. Be prepared to potentially source parts internationally, as the QL17 was sold globally.
Exercise caution when purchasing used parts, carefully reviewing descriptions and seller feedback. Prioritize reputable sellers to ensure part functionality and authenticity. Remember to verify compatibility before ordering, referencing service manuals or online forums for guidance.
Canon Support and Documentation
Direct support for the Canonet QL17 from Canon is limited due to its age; however, Canon’s official website may offer general resources for vintage cameras or provide contact information for historical inquiries. While dedicated QL17 documentation isn’t readily available on their current support pages, exploring their broader archive section could yield helpful information.
Fortunately, a wealth of user-generated documentation exists online. Numerous websites host scanned copies of the original Canonet QL17 manuals, including operation guides and service manuals. Online forums and communities dedicated to vintage cameras are invaluable resources for troubleshooting and accessing shared documentation.
Remember to cross-reference information from multiple sources to ensure accuracy. While Canon’s direct support is minimal, the collective knowledge of the vintage camera community provides ample assistance.
Leave a Reply
You must be logged in to post a comment.